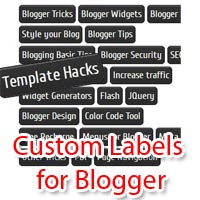
Facebook fan pages မ်ားစုစည္းမွဳ ( ၁ )

 ျမန္မာျပည္က facebook fan  page ေတြကို က႑ အလိုက္ လမ္းညြန္သေဘာမ်ဳိး
 စုစည္းေပးခ်င္တာပါ ။ ဒီဆိုက္ကို ၀င္လိုက္တာနဲ႔ ျပည္တြင္း ၊ ျပည္ပ က facebook fan
 page  အေတာ္မ်ားမ်ားကို ေတြ႔ႏိုင္မွာျဖစ္ပါတယ္။


 Online media


Aye Chan Mon
BBC Burmese
Burma-Newselite
Burmese Treasure
CJ Myanmar
International news for myanmar
Kamayut Media
Maw Gyun City
Myanmar News
Myanmar News Update
Myanmar Online News
MyanmarUpdates
Myawady Health
Myawady News
News of Myanmar
Rakhine Citizen Journalists
RFA Burmese
SearchMyanmar
Shan News
ThanLar Waddy Times
ThanLarWaddy Times
The Irrawaddy (Burmese Version)
Today Myanmar
VOA Burmese
ကေလးၿမိဳ႕ မီဒီယာ
ထား၀ယ္ျမိဳ ့ေတာ္
ပလီပလာ ေထြကာလီကာ
ပုဂံအြန္လိုင္းမီဒီယာ
မႏၱေလးေခတ္
ယေန႕ေခတ္
သတင္းခ်စ္သူ - ေဝဟင္
သတင္းစုဗူး
သတင္းစံုလင္ ေဖ.ဘုတ္တခြင္
သတင္းေလးမ်ား ဆုံဆည္းရာ
အင္းေလးမီဒီယာ
အျဖဴေရာင္မီဒီယာ
ျမန္ မာ့ စီး ပြါး ေရး ဆိုင္ ရာ သ တင္း မ်ား
ျမန္မာဓိက
ျမန္မာ့လင္းေရာင္ျခည္

 Media & Journal

7Day News Journal
8 DAYS A WEEK ENTERTAINMENT
Auto World Journal
Automobile Journal
Chindwin Magazine
CNN International
Education Digest Journal
Eleven Media Group
Eternal Light Magazine
GTR Car Journal
Health Digest Journal
Health Updates Journal
Messenger News Journal
Mizzima Journal
Myanmar Digital Life Journal
Myanmar journal download
Myanmar People Magazine
Netguide Journal
News Watch
Oasis Journal
Planet Myanmar Network
Popular Journal
Popular News
Pyimyanmar
Smart Journal
Sunday Journal
TechSpace Journal
The Modern News Journal
The Street View
The Sunlight Weekly News
The Trade Times
The Voice Weekly
TheNature
Yangon media group
YGN Style YGN Style
ပင္းယမဂၢဇင္း
ပို႔ေဆာင္ေရးသတင္းဂ်ာနယ္
ရနံ႔သစ္ မဂၢဇင္း
ေရႊဆဌဂံဂ်ာနယ္ 

 ေငြေစ်း ၊ ေရႊေစ်း ၊ စီးပြားေရး သတင္း

AGD Bank 
Ayeyarwady Bank
CB Bank 
Currencyxenxe
Estate Myanmar Real Estate Agency
KBZ Bank
Myanmar Exchange Business Information
Myanmar Stock Exchange
Rose Diamond Jewellery
WK Authorized Money Changer
Yangon Exchange Co., Ltd.
စီးပြားေရး သတင္းမ်ားႏွင့္ ခန္႕မွန္းခ်က္မ်ား
ဟသၤာတကုန္စည္ဒိုင္
အိမ္ျခံေျမ အက်ိုးေဆာင္ ကုသိုလ္ အဖြဲ႕
အိမ္၊ ၿခံ၊ ေျမ ဂ်ာနယ္
အိမ္၊ ၿခံ၊ ေၿမ
ေနာက္ ဆံုး ရ ေရႊ ေစ်း ႏွဳန္း မ်ား

 ကား ေစ်းကြက္

MMautotrader
Myanmar Cars DB
Myanmar Cars Market
Smile ကားေရာင္းသည္ Services
ကားအသစ္ေလး ေတြ ေရာင္းမယ္ ၀ယ္မယ
ကား၀ယ္ေရာင္း
သီရိမဂၤလာေစ်း ကားပြဲစားတန္း

Cartoons

AFI Cartoons
APK Fan Page
Cartoon sawmin wai
Cartoon: လိုင္လုဏ္ (LaiLone)
Comics cafe
Kyaw Thu Yein Cartoonist
Myanmar Funny Cartoons
Nyan Kyal Say - ဉာဏ္က်ယ္ေစ
Putet Comics
ကာတြန္း ၀ရဇိန္ထူးထူး
ကာတြန္းေလးမ်ား
ကာတြန္းေ၀ယံ - ေတာင္ႀကီး
ခ်စ္ေသာကာတြန္းမ်ား
စကားေျပာေနေသာ ကာတြန္းေလးမ်ား
စိတ္ႀကိဳက္ ကာတြန္းမ်ား
ထိထိ မိမိ တစ္ကြက္ ေကာင္း ကာတြန္း
ဟာသ ကာတြန္းမ်ား စုစည္းျခင္း
ေဆးေလာကဟာသမ်ား

Funny

100 percent fun
Chilly's Joke Corner
Funniest Video Ever
FUNNY / CRAZY videos and pictures
Funny Doctors
Funny Pictures
Funny Videos
FunnyHen.com
Hot Moms Club
Myanmar Adult Jokes
woahhvids Funny Videos
WTF WTF
ဘ႐ုတ္သုတ္ခ ပံုမ်ား
မရယ္ပဲ မေနနိုင္ေပါင္
ရီလိုက္ ရတာ ဖတ္ဖတ္ ေမာ ရင္ဘတ္ေနာက္ က ေက်ာ
ရွာရွာေဖြေဖြ ၿပံဳး
သမၼတေလာင္း ေမာင္သံေခ်ာင္း ကို အားေပး ခ်စ္ခင္သူမ်ား
ဟာသကမၻာ (Funny World)
ဟာသဓါတ္ပံုမ်ား
ဟာသဗိမာန္-ဆရာသန္
ဟာသသီးသန္႔
ဟာသဥယ်ာဥ္ (funny garden)
ဟာသေက်းရြာ
အဓိပၸါယ္ ေရာက္ခ်င္ရာေရာက္ ဟာသမ်ား
အူတက္ ေအာင္ရီရေသာ ဟာသမ်ားနဲ႕အျခား
အေပၚက တစ္ေယာက္ ေျပာတဲ့စကားကို နားမေထာင္နဲ ့၊သူက ယဥ္ယဥ္ေလး ရူးေနတာ
ေပါက္ကရေလးဆယ္
ေပါက္ကရ၄၀ပံုမ်ား
ေပါေၾကာင္ေၾကာင္ဟာသမ်ား
ေမာင္ေကာင္းထိုက္၏ ဟာသမ်ား
ၾကိဳက္ ရင္ Like မယ္ ရီျပီးပီဆို Share ေပးပါ

 သုတ ပေဒသာ

Knowledge Bank
Scientist Myanmar
စြယ္စံုက်မ္း
သုတစြယ္စံုက်မ္း
သုတဘဏ္
အဆိုအမိန္ ့မ်ားနွင့္ ဗဟုသုတ ဆုိင္ရာ စာေပမ်ား

ျမန္မာ႔ ရိုးရာ

Cute myanmar girls
Htwe Oo Myanmar
Kachin Traditional Culture
Myanmar Art and Crafts
Myanmar Dance, Drama and Opera
Myanmar Flora and Fauna
Myanmar Historical Archive
Myanmar Old Photos
Myanmar Traditional Dresses
Myanmar Traditional Medicine
ရိုးရာခ်ည္ထည္မ်ား
ျမန္မာ ဆန္ဆန္ျမန္မာ့ ရိုးရာ
ျမန္မာ့လက္ေဝွ႔ - Myanmar Lethwei
ျမန္မာ႔ရိုးရာ လက္ေဝွ႔ပြဲမ်ား

 Amazing

1,000,000 Pictures
Amazing Facts
Amazing Hairstyles
Amazing Pictures
Amazing Things in the World
Amazing Videos
Beautiful & Amazing Pics
Born in 90s (1990-1999)
I Can't Believe It
Interesting Things
Millions of Amazing Pictures
Super beautiful photos
U & Me  -  We Are The Family
Weird And Wonderful
Wow! I love these pics.
ကမၻာ့အံ့ဖြယ္ ေနရာမ်ား
ထူးထူးဆန္းဆန္း
ယူက်ဴ႕ဘီမွ ထူးေထြ ဆန္းၿပား ဗီဒီယိုမ်ား


Source :

Google Chrome Browser မွာ ျမန္မာစာေပၚခ်င္တယ္ဆိုရင္


Google Chrome Browser ဆိုတာကလည္း သံုးဖူးတဲ့သူငယ္ခ်င္းမ်ား သိတဲ့အတိုင္း ..  Mozilla Firefox နဲ႔ ယွဥ္လိုက္ရင္ ေတာ္ေတာ္ကို ျမန္တဲ့ ဘေရာက္ဇာေလးပါ .. Mozilla က Loading ေတာ္ေတာ္လုပ္ယူေနရတဲ့ Page မ်ိဳးေတာင္ Chrome က အပ်ိဳရည္မပ်က္ပဲ ဆြဲတင္ေပးႏိုင္တာ ေတြ႕ရပါတယ္ ..
ဒါေပမယ့္ .. Google Chrome Browser နဲ႔ပတ္သက္တဲ့ အမ်ားဆံုးေတြ႕ရတဲ့ ျပႆနာကေတာ့ ျမန္မာစာ အဆင္ေျပေအာင္ လုပ္တဲ့ေနရာမွာ တစ္ခ်ိဳ႕ေတြအတြက္ ေတာ္ေတာ္ေလးခက္ခဲေနတဲ့ အခ်က္ပါပဲ ..
  
ဒီျပႆနာကို ေျဖရွင္းဖို႔ နည္းလမ္းေတြ အမ်ားႀကီးရွိတဲ့ထဲက ဘာ Add Ons မွလည္း မလို .. ဘာ Settings မွလည္း မလိုတဲ့နည္းေလးကို သူငယ္ခ်င္းတို႔ကို မွ်ေ၀ေပးလိုက္ပါတယ္ .. တစ္ဆင့္ခ်င္းကို ပံုေတြနဲ႔ အေသးစိပ္ျပထားပါတယ္ .. ပံုေတြ၀ါးေနရင္ ေသးေနရင္ ပံုေပၚကို ေမာက္ေလးတင္လိုက္ပါ .. အဆင္ေျပသြားပါလိမ့္မယ္ ..

ကဲ .. ပထမဆံုး Control Panel ကိုသြားၿပီး Folder Options ကိုႏွိပ္ပါ ..


ပြင့္လာတဲ့ထဲက View ကိုႏွိပ္ၿပီး .. Show hidden files, folders and drives ရဲ႕ေရွ႕မွာ ကလစ္ေပးၿပီး အမွတ္တပ္လိုက္ပါ .. ၿပီးရင္ Apply ႏွိပ္ .. Ok ႏွိပ္ ... တစ္ဆင့္ၿပီးပါၿပီ


ေနာက္တစ္ဆင့္ကေတာ့ Partition C ကို ဖြင့္ပါ .. ပြင့္လာတဲ့ထဲက Users ဆိုတဲ့ ဖိုလ္ဒါကို ထပ္ဖြင့္ပါ


ပြင့္လာတဲ့ထဲက ကိုယ္နံမည္နဲ႔ ဖိုလ္ဒါကိုဖြင့္ပါ .. (ကၽြန္ေတာ့္အတြက္ဆိုေတာ့ It Motesoe ဆိုတဲ့ဖိုလ္ဒါကို ဖြင့္လိုက္ပါတယ္)


ပြင့္လာတဲ့ထဲက AppData ဆိုတဲ့ ဖိုလ္ဒါကို ဖြင့္လိုက္ပါ ..


ေနာက္ထပ္ ပြင့္လာတဲ့ထဲက Local ဆိုတဲ့ဖိုလ္ဒါကို ထပ္ဖြင့္လိုက္ပါ


ပြင့္လာတဲ့ထဲက Google ဆိုတဲ့ဖိုလ္ဒါကိုထပ္ဖြင့္လိုက္ပါ ..


ေနာက္ထပ္ Chrome ဆိုတဲ့ဖိုလ္ဒါကိုဖြင့္ပါ ..


ပြင့္လာတဲ့ထဲက User Data ဆိုတဲ့ဖိုလ္ဒါကိုဖြင့္ပါ ..


ေနာက္ထပ္ Default ဆိုတဲ့ဖိုလ္ဒါကို ဖြင့္ပါ ..


ပြင့္လာတဲ့ထဲက User StyleSheets ဆိုတဲ့ဖိုလ္ဒါကို ဖြင့္ပါ ..
အထဲမွာ Custom ဆိုတဲ့ .css ဖိုင္ေလးတစ္ဖိုင္ကို ေတြ႕ရပါလိမ့္မယ္ ..


အဲဒီဖိုင္ကိုေတြ႕ၿပီဆိုရင္ .. ေအာက္မွာ ေပးထားတဲ့ကုဒ္ေတြကို Copy ကူးယူလိုက္ပါ ..

* , html, body, div, p{font-family:Zawgyi-One !important;}


အဲဒီကုဒ္ေတြကို ေကာ္ပီကူးယူၿပီးၿပီဆိုရင္ .. အေစာပိုင္းကေတြ႕တဲ့ Custom ဆိုတဲ့ .css ဖိုင္ေပၚမွာ Right Click ႏွိပ္ၿပီး ပြင့္လာတဲ့ထဲက Edit ကိုႏွိပ္လိုက္ပါ .. 


ဘာမွမပါတဲ့ notepad စာမ်က္ႏွာတစ္ခု ပြင့္လာပါမယ္ ..
အဲဒီ ထဲမွာ အေစာပိုင္းက ေကာ္ပီကူးယူလာတဲ့ ကုဒ္ေတြကို Paste လုပ္လိုက္ပါ ..


ၿပီးရင္ ညာဖက္အေပၚေဒါင့္နားက ၾကက္ေျခခပ္ပံုေလးကိုႏွိပ္ၿပီး အဲဒီ .css ဖိုင္ကို ပိတ္လိုက္ပါ ..

သိမ္းမွာလားလို႔ ေမးတဲ့ Box ေလး တက္လာရင္ .. Save ကို ႏွိပ္ေပးလိုက္ပါ ..


ကဲ .. သူငယ္ခ်င္းတို႔ရဲ႕  Google Chrome ဘေရာက္ဇာကို ဖြင့္ၿပီး ႀကိဳက္တဲ့ေနရာမွာ ျမန္မာစာလံုးေတြကို ႐ိုက္ထည့္ၾကည့္ပါ .. အဆင္ေျပသြားတာကို ေတြ႕ရပါလိမ့္မယ္ .. ( တျခား .. ဘာ Settings မွ လုပ္စရာမလိုတဲ့နည္းပါ )


ဒါမွအဆင္မေျပေသးဘူးဆိုရင္ေတာ့ .. ဘေရာက္ဇာထဲမွာရွိတဲ့ Option ကေန ၀င္ၿပီးျပင္ေပးလိုက္ပါဦး ..
Chrome Browser ရဲ႕ ညာဖက္အေပၚေဒါင့္နားက ဂြပံု ေလးကိုႏွိပ္ၿပီး က်လာတဲ့ထဲက Options ကိုႏွိပ္ပါ ..


ပြင့္လာတဲ့ထဲမွာ .. ေအာက္ကပံုအတိုင္းျဖစ္ေအာင္ ျပင္ေပးလိုက္ပါ ...


ပြင့္လာတဲ့ထဲမွာ .. ေအာက္ကပံုအတိုင္းျဖစ္ေအာင္ ျပင္ေပးလိုက္ပါ ...


ဒါဆိုရင္ေတာ့ အဆင္ေျပသြားပါၿပီ ..

Source :  အိုင္တီမုဆိုး
Customize Labels Widget with Stylish Cool Effects

Customize Labels Widget with Stylish Cool Effects
Labels widget displays list of the categories of posts. Creating labels helps to categorize the posts in groups. So it helps visitors to see the posts under a category. Default bloggerLabels widget is not so Stylish. Don't worry, here I am sharing some cool interesting labels widget styles for you. This Labels widget can style using simple CSS codes. To do this follow the steps..


  •  Sign In to Blogger Dashboard
  • Go to Template -> Edit HTML
  • Find ]]></b:skin> and copy the code of label style you like above ]]></b:skin>
  • Save Template

 Black Forest Theme Labels With Animated Scaling

.Label li {
        background: linear-gradient(to bottom, #6B6B6B 0%, #6B6B6B 4%, #333333 1%, #2B2B2B 100%) repeat scroll 0 0 transparent;
        border: 1px solid;
        border-radius: 6px 6px 6px 6px;
        float: left;
        font-size: 116%;
        list-style: none outside none;
        margin: 2px;
        padding: 4px;
        transition: all 0.3s ease 0s;
    }
.Label li:hover {
    transform: rotate(351deg) scale(1.7);
}

Yellow Customized Labels Widget


    .Label li:before {

        background-image: -moz-linear-gradient(left top , #FEDA71, #FEBA47);

        border-bottom: 1px solid #D99D38;

        border-left: 1px solid #D99D38;

        content: "";

        height: 1.39em;

        left: -0.69em;

        position: absolute;

        top: 0.2em;

        transform: rotate(45deg);

        width: 1.3em;

        z-index: 1;

    }

    .Label li:after {

        background: none repeat scroll 0 0 #FFFFFF;

        border: 1px solid #D99D38;

        border-radius: 4.167em 4.167em 4.167em 4.167em;

        box-shadow: 0 1px 0 #FAEABA;

        content: "";

        height: 0.5em;

        left: -0.083em;

        position: absolute;

        top: 0.667em;

        width: 0.5em;

        z-index: 9999;

    }

    .Label li {

        background-image: -moz-linear-gradient(center top , #FEDA71, #FEBA47);

        border-bottom: 1px solid #D99D38;

        border-radius: 0 0.25em 0.25em 0;

        border-right: 1px solid #D99D38;

        border-top: 1px solid #D99D38;

        box-shadow: 0 1px 0 #FAEABA inset, 0 1px 1px rgba(0, 0, 0, 0.1);

        color: #996633;

        float: left;

        font-family: 'Helvetica Neue',Helvetica,Arial,sans-serif;

        font-size: 0.75em;

        font-weight: bold;

        list-style: none outside none;

        margin: 0 0 7px 20px;

        padding: 0.417em 0.417em 0.417em 0.917em;

        position: relative;

        text-decoration: none;

        text-shadow: 0 1px 0 rgba(255, 255, 255, 0.4);

        z-index: 1;

    }

Blue Customized Labels Widget

    .Label li:before {

        background-image: -moz-linear-gradient(center top , #1E5799 0%, #207CCA 100%);

        border-bottom: 1px solid #145091;

        border-left: 1px solid #145091;

        content: "";

        height: 1.39em;

        left: -0.69em;

        position: absolute;

        top: 0.2em;

        transform: rotate(45deg);

        width: 1.3em;

        z-index: 1;

    }

    .Label li:after {

        background: none repeat scroll 0 0 #FFFFFF;

        border: 1px solid #3F6893;

        border-radius: 4.167em 4.167em 4.167em 4.167em;

        box-shadow: 0 1px 0 #B5D8FF;

        content: "";

        height: 0.5em;

        left: -0.083em;

        position: absolute;

        top: 0.667em;

        width: 0.5em;

        z-index: 9999;

    }

    .Label li {

        background-image: -moz-linear-gradient(center top , #1E5799, #207CCA);

        border-bottom: 1px solid #145091;

        border-radius: 0 0.25em 0.25em 0;

        border-right: 1px solid #145091;

        border-top: 1px solid #145091;

        box-shadow: 0 1px 0 #CCE4FF inset, 0 1px 1px rgba(0, 0, 0, 0.1);

        color: #996633;

        float: left;

        font-family: 'Helvetica Neue',Helvetica,Arial,sans-serif;

        font-size: 0.75em;

        font-weight: bold;

        list-style: none outside none;

        margin: 0 0 7px 20px;

        padding: 0.417em 0.417em 0.417em 0.917em;

        position: relative;

        text-decoration: none;

        text-shadow: 0 1px 0 rgba(255, 255, 255, 0.4);

        z-index: 1;

    }

 Black Forest Theme Label Like NetOops Blog Labels


    .Label li {

        background: linear-gradient(to bottom, #6B6B6B 0%, #6B6B6B 4%, #333333 1%, #2B2B2B 100%) repeat scroll 0 0 transparent;

        border: 1px solid;

        border-radius: 6px 6px 6px 6px;

        float: left;

        font-size: 116%;

        list-style: none outside none;

        margin: 2px;

        padding: 4px;

        transition: all 0.3s ease 0s;

    }

    .Label li:hover {

        transform: rotate(5deg);

    }

Skeleton Theme For Labels Widget

.Label a {
    color: #000000;
    text-decoration: none;
}
.Label li {
    border: 1px solid #000;
    border-radius: 6px 6px 6px 6px;
    color: #000000 !important;
    float: left;
    font-size: 116%;
    list-style: none outside none;
    margin: 2px;
    padding: 4px;
    transition: all 0.3s ease 0s;
}

Skeleton Theme With Painting Hover Effect

 
.Label a:hover
{
text-shadow:5px 5px 5px #dcdcdc;
background:orange;
border:1px solid orange;
border-bottom-right-radius: 0px;
border-top-left-radius: 0px;
border-bottom-left-radius: 30px;
border-top-right-radius: 30px;
}

Leaf Theme For Labels Widget


.Label a {
     -moz-border-bottom-colors: none;
     -moz-border-left-colors: none;
     -moz-border-right-colors: none;
     -moz-border-top-colors: none;
     background-color: #7FBF4D;
     background-image: -moz-linear-gradient(center top , #7FBF4D, #63A62F);
     border-bottom-right-radius: 30px;
     border-color: #63A62F #63A62F #5B992B;
     border-image: none;
     border-style: solid;
     border-top-left-radius: 30px;
     border-width: 1px;
     box-shadow: 0px 1px 0px 0px #96CA6D inset;
     color: #FFFFFF;
     float: left;
     font: 14px verdana;
     height: 18px;
     margin-bottom: 9px;
     margin-left: 10px;
     padding: 10px;
     position: relative;
     text-decoration: none;
     transition: all 0.5s ease-in-out 0s;
}

.Label a:hover {
     background: none repeat scroll 0% 0% orange;
     border-radius: 0px 30px 0px 30px;
     border: 1px solid orange;
     text-shadow: 5px 5px 5px #DCDCDC;
}

.Label {
     margin: 0px;
     padding: 0px;
     position: relative;
}

How to center any Blogger widget

How to center any Blogger widget gadget

The codes below can be used to align your custom or third party widgets to the center via Blogger Dashboard > Layout > Add Gadget > HTML/Java Scripts 

Option one
<div align="center">Your Widget Code</div>
Option two
<center>Your Widget Code</center>
Option three
<p align="center">Your Widget Code</p>
Simply replace the text in blue with your widget code.

Add the CSS rule to all widgets


The CSS rule below will center all widgets on your blog.  Go to your Blogger dashboard >Template Customize > Advanced > Add CSS and apply to blog.
.widget {text-align: center;}
The CSS rule below will center any one of your widgets.  Replace the text in blue with the widget ID.  Go to your Blogger dashboard > Template Customize > Advanced > Add CSS and apply to blog.
#Your-widget-ID {text-align: center;}
Helpful Blogger tip on How to find widget ID?

Job Done...


Source :http://thebestshwenagar.blogspot.com/2013/10/how-to-center-any-blogger-widget.html

Popular Posts With Automatic Numbering - Bubbles!

Popular Posts Widget

When blogger released Popular Posts widget back in 2011, we leaked out its stylesheet so that you can customize it to blend it perfectly to your BlogSpot templates. Today we will learn how to display the list of popular posts using CSS3 auto increment property. You can style the numbers in variety of shapes, we styled them in square/rectangular and circular shape. you guys were the first to display threaded comments with Comment Counts and today you will again learn something more interesting. You can see a practical demo of this implementation on our sidebar. Lets add this effect to blogger in fairly easy steps using pure styles with no use of JavaScript.


Popular posts widget is an effective tool to increase your blog pageviews and engage readers more on your blog. It fetches and ranks posts based on most visited pages using your Google analytics data.

Add Popular Posts Widget

  1. Go to Blogger > Layout
  2. Click "Add a Gadget"
  3. Choose "Popular Posts"  from the list
  4. You will need to configure its settings as shown in the image below: uncheck "image thumbnail" and also "snippet"   Its better that you display at most 7-9 posts. Less is good and clean.

popular posts widget settings
       5.  Save it

Customize Popular Posts Plugin

Now you need to change the default styles and change its look to our desired design using Custom styles.
  1. Go To Blogger > Template
  2. Backup your Template
  3. Click Edit HTML
  4. Search for </b:skin>.  Click the black arrow to expand the code.
compressed blogger stylesheet
   5.  Paste the following Styles just above </b:skin>
/*--- MBT Popular Posts --- */
.popular-posts ul {
padding-left: 0px;
counter-reset: popcount;
}
.popular-posts ul li:before {
list-style-type: none;
margin-right: 15px;
padding: 0.3em 0.6em;
counter-increment: popcount;
content: counter(popcount);
font-size: 16px;
background: #292D30;
color: #ffffff;
position: relative;
font-weight: bold;
font-family: georgia;
float: left;
border: 2px solid #dddddd;
box-shadow: 1px 2px 9px #666666; }
.popular-posts ul li {
border-bottom: 1px dashed #dddddd;
}
.popular-posts ul li:hover {
border-bottom: 1px dashed #696969;
}
.popular-posts ul li a {
text-decoration:none; color:#5A5F63;
}

.popular-posts ul li a:hover {
text-decoration:none;
}
Customization:
  • To change the background color of the Square bubble edit #292D30
  • To change the text color of the bubble edit #ffffff
  • By default the shape of the bubble is Square. To change it to Circle simply add the following code just after box-shadow: 1px 2px 9px #666666;
border-radius:15px;

    6. Save your template and you are all done!
Visit your blog to see it working just perfectly.

Customize Labels Cloud in Blogger


label cloud widget

Turn Random Cloud display into Blocks

The code below can be customized in several ways to create exciting label designs. You can also add background images to them.
Follow these easy steps:
  1. Go to Blogger > Settings> Layouts
  2. Click add a gadget and choose Labels                     
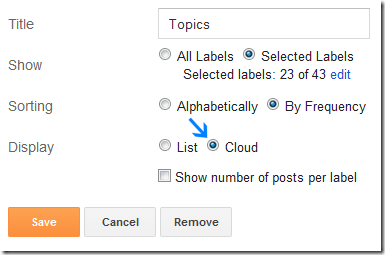
  3. Inside the settings make sure to choose the cloud display. You may set other options as per your requirement. See the screenshot below as example 
labels settings

Please choose to display at most 25 labels. Too much labels on homepage look awkward. Showcase your best categories only.
       4.    Now save the widget and go to settings > Template
       5.     Backup your template
       6.     Click Edit html > Proceed  and search for this
]]></b:skin>
        7.   Just above it paste the following CSS code:
/*-----Custom Labels Cloud widget by www.MyBloggerTricks.com----*/
.label-size{
margin:0 2px 6px 0;
padding: 3px;
text-transform: uppercase;
border: solid 1px #C6C6C6;
border-radius: 3px;
float:left;
text-decoration:none;
font-size:10px;
color:#666;
}

.label-size:hover {
border:1px solid #6BB5FF;
text-decoration: none;
-moz-transition: all 0.5s ease-out;
-o-transition: all 0.5s ease-out;
-webkit-transition: all 0.5s ease-out;
-ms-transition: all 0.5s ease-out;
transition: all 0.5s ease-out;
-moz-transform: rotate(7deg);
-o-transform: rotate(7deg);
-webkit-transform: rotate(7deg);
-ms-transform: rotate(7deg);
transform: rotate(7deg);
filter: progid:DXImageTransform.Microsoft.Matrix(
                    M11=0.9961946980917455, M12=-0.08715574274765817, M21=0.08715574274765817, M22=0.9961946980917455, sizingMethod='auto expand');
zoom: 1;
}

.label-size a  {
text-transform: uppercase;
float:left;
text-decoration: none;
}
.label-size a:hover  {
text-decoration: none;
}
          8.  Save your template
         9.    All done!
Visit your blogs and see the labels completely transformed to small neatly crafted rectangular boxes. If in case you want the label boxes to be of random sizes depending on the post-count then simply delete font-size:10px; from the above code. 

Source :http://thebestshwenagar.blogspot.com/2013/10/customize-labels-cloud-in-blogger.html