Showing posts with label blog. Show all posts

How to Solve ”An error occurred while trying to save or publish your post. Please try again. Ignore warning

Overcoming "An error message occurred while trying to save or publish your post. Please try again". Some time, when we want our posts to publish a frequently post an error this message appears "An error message occurred while trying to save or publish your post. Please try again". After re-check post we made, there was no error, where normally this message will appear if we mistakenly wrote any code tag, for example: we implement a feature or widget that uses the prefix <div> and they aren't at the end of the code so we close with close tag </ div> the message "An error message occurred while trying to save or publish your post. Please try again" will appear naturally as a warning error in the writing of code in our template post.

But after a while, the message just shows up without any apparent reason. How come?
Actually, the emergence of this warning is not just a problem, it's just really annoying that in 30 seconds warning continues to appear more than once ... really disturbing concentration and the view when we were making a new post.

How to get rid of this message can actually be said to be easy => Click "Ignore warning", then it will disappear instantly. So what if they come up too?

Follow these tips on "Overcoming An error message occurred while trying to save or publish your post. Please try again" the following:

1. If you believe my friend has finished writing the post and now it's time to publish, then click on the "save" (try to click the "publish" first, if it fails it has click the "save")
2. Now, please click on the part that I have marked in read the following ...
Furthermore buddy will be taken to the "all posts" (page editing all the posts, including: published posts and drafts). Here is a post that my friend who has successfully written but not yet published (illustration: draft post):
3. The next step, check the written post and click the "Publish". Done ...
Now post buddy has successfully published. If you still have problems ... please feel free to ask or comment, Thanks.

Customize Labels Widget with Stylish Cool Effects

Customize Labels Widget with Stylish Cool Effects
Labels widget displays list of the categories of posts. Creating labels helps to categorize the posts in groups. So it helps visitors to see the posts under a category. Default bloggerLabels widget is not so Stylish. Don't worry, here I am sharing some cool interesting labels widget styles for you. This Labels widget can style using simple CSS codes. To do this follow the steps..


  •  Sign In to Blogger Dashboard
  • Go to Template -> Edit HTML
  • Find ]]></b:skin> and copy the code of label style you like above ]]></b:skin>
  • Save Template

 Black Forest Theme Labels With Animated Scaling

.Label li {
        background: linear-gradient(to bottom, #6B6B6B 0%, #6B6B6B 4%, #333333 1%, #2B2B2B 100%) repeat scroll 0 0 transparent;
        border: 1px solid;
        border-radius: 6px 6px 6px 6px;
        float: left;
        font-size: 116%;
        list-style: none outside none;
        margin: 2px;
        padding: 4px;
        transition: all 0.3s ease 0s;
    }
.Label li:hover {
    transform: rotate(351deg) scale(1.7);
}

Yellow Customized Labels Widget


    .Label li:before {

        background-image: -moz-linear-gradient(left top , #FEDA71, #FEBA47);

        border-bottom: 1px solid #D99D38;

        border-left: 1px solid #D99D38;

        content: "";

        height: 1.39em;

        left: -0.69em;

        position: absolute;

        top: 0.2em;

        transform: rotate(45deg);

        width: 1.3em;

        z-index: 1;

    }

    .Label li:after {

        background: none repeat scroll 0 0 #FFFFFF;

        border: 1px solid #D99D38;

        border-radius: 4.167em 4.167em 4.167em 4.167em;

        box-shadow: 0 1px 0 #FAEABA;

        content: "";

        height: 0.5em;

        left: -0.083em;

        position: absolute;

        top: 0.667em;

        width: 0.5em;

        z-index: 9999;

    }

    .Label li {

        background-image: -moz-linear-gradient(center top , #FEDA71, #FEBA47);

        border-bottom: 1px solid #D99D38;

        border-radius: 0 0.25em 0.25em 0;

        border-right: 1px solid #D99D38;

        border-top: 1px solid #D99D38;

        box-shadow: 0 1px 0 #FAEABA inset, 0 1px 1px rgba(0, 0, 0, 0.1);

        color: #996633;

        float: left;

        font-family: 'Helvetica Neue',Helvetica,Arial,sans-serif;

        font-size: 0.75em;

        font-weight: bold;

        list-style: none outside none;

        margin: 0 0 7px 20px;

        padding: 0.417em 0.417em 0.417em 0.917em;

        position: relative;

        text-decoration: none;

        text-shadow: 0 1px 0 rgba(255, 255, 255, 0.4);

        z-index: 1;

    }

Blue Customized Labels Widget

    .Label li:before {

        background-image: -moz-linear-gradient(center top , #1E5799 0%, #207CCA 100%);

        border-bottom: 1px solid #145091;

        border-left: 1px solid #145091;

        content: "";

        height: 1.39em;

        left: -0.69em;

        position: absolute;

        top: 0.2em;

        transform: rotate(45deg);

        width: 1.3em;

        z-index: 1;

    }

    .Label li:after {

        background: none repeat scroll 0 0 #FFFFFF;

        border: 1px solid #3F6893;

        border-radius: 4.167em 4.167em 4.167em 4.167em;

        box-shadow: 0 1px 0 #B5D8FF;

        content: "";

        height: 0.5em;

        left: -0.083em;

        position: absolute;

        top: 0.667em;

        width: 0.5em;

        z-index: 9999;

    }

    .Label li {

        background-image: -moz-linear-gradient(center top , #1E5799, #207CCA);

        border-bottom: 1px solid #145091;

        border-radius: 0 0.25em 0.25em 0;

        border-right: 1px solid #145091;

        border-top: 1px solid #145091;

        box-shadow: 0 1px 0 #CCE4FF inset, 0 1px 1px rgba(0, 0, 0, 0.1);

        color: #996633;

        float: left;

        font-family: 'Helvetica Neue',Helvetica,Arial,sans-serif;

        font-size: 0.75em;

        font-weight: bold;

        list-style: none outside none;

        margin: 0 0 7px 20px;

        padding: 0.417em 0.417em 0.417em 0.917em;

        position: relative;

        text-decoration: none;

        text-shadow: 0 1px 0 rgba(255, 255, 255, 0.4);

        z-index: 1;

    }

 Black Forest Theme Label Like NetOops Blog Labels


    .Label li {

        background: linear-gradient(to bottom, #6B6B6B 0%, #6B6B6B 4%, #333333 1%, #2B2B2B 100%) repeat scroll 0 0 transparent;

        border: 1px solid;

        border-radius: 6px 6px 6px 6px;

        float: left;

        font-size: 116%;

        list-style: none outside none;

        margin: 2px;

        padding: 4px;

        transition: all 0.3s ease 0s;

    }

    .Label li:hover {

        transform: rotate(5deg);

    }

Skeleton Theme For Labels Widget

.Label a {
    color: #000000;
    text-decoration: none;
}
.Label li {
    border: 1px solid #000;
    border-radius: 6px 6px 6px 6px;
    color: #000000 !important;
    float: left;
    font-size: 116%;
    list-style: none outside none;
    margin: 2px;
    padding: 4px;
    transition: all 0.3s ease 0s;
}

Skeleton Theme With Painting Hover Effect

 
.Label a:hover
{
text-shadow:5px 5px 5px #dcdcdc;
background:orange;
border:1px solid orange;
border-bottom-right-radius: 0px;
border-top-left-radius: 0px;
border-bottom-left-radius: 30px;
border-top-right-radius: 30px;
}

Leaf Theme For Labels Widget


.Label a {
     -moz-border-bottom-colors: none;
     -moz-border-left-colors: none;
     -moz-border-right-colors: none;
     -moz-border-top-colors: none;
     background-color: #7FBF4D;
     background-image: -moz-linear-gradient(center top , #7FBF4D, #63A62F);
     border-bottom-right-radius: 30px;
     border-color: #63A62F #63A62F #5B992B;
     border-image: none;
     border-style: solid;
     border-top-left-radius: 30px;
     border-width: 1px;
     box-shadow: 0px 1px 0px 0px #96CA6D inset;
     color: #FFFFFF;
     float: left;
     font: 14px verdana;
     height: 18px;
     margin-bottom: 9px;
     margin-left: 10px;
     padding: 10px;
     position: relative;
     text-decoration: none;
     transition: all 0.5s ease-in-out 0s;
}

.Label a:hover {
     background: none repeat scroll 0% 0% orange;
     border-radius: 0px 30px 0px 30px;
     border: 1px solid orange;
     text-shadow: 5px 5px 5px #DCDCDC;
}

.Label {
     margin: 0px;
     padding: 0px;
     position: relative;
}

How to center any Blogger widget

How to center any Blogger widget gadget

The codes below can be used to align your custom or third party widgets to the center via Blogger Dashboard > Layout > Add Gadget > HTML/Java Scripts 

Option one
<div align="center">Your Widget Code</div>
Option two
<center>Your Widget Code</center>
Option three
<p align="center">Your Widget Code</p>
Simply replace the text in blue with your widget code.

Add the CSS rule to all widgets


The CSS rule below will center all widgets on your blog.  Go to your Blogger dashboard >Template Customize > Advanced > Add CSS and apply to blog.
.widget {text-align: center;}
The CSS rule below will center any one of your widgets.  Replace the text in blue with the widget ID.  Go to your Blogger dashboard > Template Customize > Advanced > Add CSS and apply to blog.
#Your-widget-ID {text-align: center;}
Helpful Blogger tip on How to find widget ID?

Job Done...


Source :http://thebestshwenagar.blogspot.com/2013/10/how-to-center-any-blogger-widget.html

Popular Posts With Automatic Numbering - Bubbles!

Popular Posts Widget

When blogger released Popular Posts widget back in 2011, we leaked out its stylesheet so that you can customize it to blend it perfectly to your BlogSpot templates. Today we will learn how to display the list of popular posts using CSS3 auto increment property. You can style the numbers in variety of shapes, we styled them in square/rectangular and circular shape. you guys were the first to display threaded comments with Comment Counts and today you will again learn something more interesting. You can see a practical demo of this implementation on our sidebar. Lets add this effect to blogger in fairly easy steps using pure styles with no use of JavaScript.


Popular posts widget is an effective tool to increase your blog pageviews and engage readers more on your blog. It fetches and ranks posts based on most visited pages using your Google analytics data.

Add Popular Posts Widget

  1. Go to Blogger > Layout
  2. Click "Add a Gadget"
  3. Choose "Popular Posts"  from the list
  4. You will need to configure its settings as shown in the image below: uncheck "image thumbnail" and also "snippet"   Its better that you display at most 7-9 posts. Less is good and clean.

popular posts widget settings
       5.  Save it

Customize Popular Posts Plugin

Now you need to change the default styles and change its look to our desired design using Custom styles.
  1. Go To Blogger > Template
  2. Backup your Template
  3. Click Edit HTML
  4. Search for </b:skin>.  Click the black arrow to expand the code.
compressed blogger stylesheet
   5.  Paste the following Styles just above </b:skin>
/*--- MBT Popular Posts --- */
.popular-posts ul {
padding-left: 0px;
counter-reset: popcount;
}
.popular-posts ul li:before {
list-style-type: none;
margin-right: 15px;
padding: 0.3em 0.6em;
counter-increment: popcount;
content: counter(popcount);
font-size: 16px;
background: #292D30;
color: #ffffff;
position: relative;
font-weight: bold;
font-family: georgia;
float: left;
border: 2px solid #dddddd;
box-shadow: 1px 2px 9px #666666; }
.popular-posts ul li {
border-bottom: 1px dashed #dddddd;
}
.popular-posts ul li:hover {
border-bottom: 1px dashed #696969;
}
.popular-posts ul li a {
text-decoration:none; color:#5A5F63;
}

.popular-posts ul li a:hover {
text-decoration:none;
}
Customization:
  • To change the background color of the Square bubble edit #292D30
  • To change the text color of the bubble edit #ffffff
  • By default the shape of the bubble is Square. To change it to Circle simply add the following code just after box-shadow: 1px 2px 9px #666666;
border-radius:15px;

    6. Save your template and you are all done!
Visit your blog to see it working just perfectly.

Customize Labels Cloud in Blogger


label cloud widget

Turn Random Cloud display into Blocks

The code below can be customized in several ways to create exciting label designs. You can also add background images to them.
Follow these easy steps:
  1. Go to Blogger > Settings> Layouts
  2. Click add a gadget and choose Labels                     
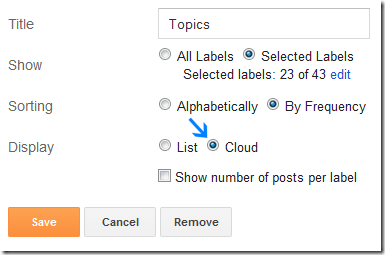
  3. Inside the settings make sure to choose the cloud display. You may set other options as per your requirement. See the screenshot below as example 
labels settings

Please choose to display at most 25 labels. Too much labels on homepage look awkward. Showcase your best categories only.
       4.    Now save the widget and go to settings > Template
       5.     Backup your template
       6.     Click Edit html > Proceed  and search for this
]]></b:skin>
        7.   Just above it paste the following CSS code:
/*-----Custom Labels Cloud widget by www.MyBloggerTricks.com----*/
.label-size{
margin:0 2px 6px 0;
padding: 3px;
text-transform: uppercase;
border: solid 1px #C6C6C6;
border-radius: 3px;
float:left;
text-decoration:none;
font-size:10px;
color:#666;
}

.label-size:hover {
border:1px solid #6BB5FF;
text-decoration: none;
-moz-transition: all 0.5s ease-out;
-o-transition: all 0.5s ease-out;
-webkit-transition: all 0.5s ease-out;
-ms-transition: all 0.5s ease-out;
transition: all 0.5s ease-out;
-moz-transform: rotate(7deg);
-o-transform: rotate(7deg);
-webkit-transform: rotate(7deg);
-ms-transform: rotate(7deg);
transform: rotate(7deg);
filter: progid:DXImageTransform.Microsoft.Matrix(
                    M11=0.9961946980917455, M12=-0.08715574274765817, M21=0.08715574274765817, M22=0.9961946980917455, sizingMethod='auto expand');
zoom: 1;
}

.label-size a  {
text-transform: uppercase;
float:left;
text-decoration: none;
}
.label-size a:hover  {
text-decoration: none;
}
          8.  Save your template
         9.    All done!
Visit your blogs and see the labels completely transformed to small neatly crafted rectangular boxes. If in case you want the label boxes to be of random sizes depending on the post-count then simply delete font-size:10px; from the above code. 

Source :http://thebestshwenagar.blogspot.com/2013/10/customize-labels-cloud-in-blogger.html

Error Messages in New Blogger Templates


New Blogger Templates are coded in XHTML which is based on XML. XHTML is a much stricter language than HTML and you will encounter more error messages while working on the new templates...........

USING OLD BLOGGER TEMPLATE. The commonest mistake made is pasting a HTML old blogger template into the Edit Template text box. The error message given when you attempt to Preview or save a HTML template is :

Your template could not be parsed as it is not well-formed. Please make sure all XML elements are closed properly.
XML error message: The content of elements must consist of well-formed character data or markup.

This error message is given because HTML templates are not "well formed". HTML templates are incompatible with the new blogger unless you have chosen to retain the Classic template AFTER migrating to the new Blogger. Going from old blogger to the new blogger is a two step process with the second step being optional. The first step is when the blog is migrated to the new blogger along with the old HTML template also called the Classic Template. The second step is UPGRADATION to the new template as outlined in theIntroduction.


WHEN THERE IS NO MATCHING END TAG : In XHTML every tag should have a matching end tag. If there is a end tag missing you will get the following error message :

Your template could not be parsed as it is not well-formed. Please make sure all XML elements are closed properly.
XML error message: The element type "div" must be terminated by the matching end-tag "

Matching end tags are </div> for <div>.

This error is most frequently seen when adding Metatags. Make sure that all your metatags in the new templates end with a forward slash.
All tags should be closed using a forward slash. If there are empty tags then they should be closed by putting a space before the forward slash. For example : <br />. Empty elements are those not enclosing anything between the opening and closing tags. For example :
<img src="valid.gif" />.


USING THE CHARACTER "&". When using ampersand within an attribute value it should always be written using a m p; (without the spaces) and not simply an & character. If this is not done you will get the following error message :

Your template could not be parsed as it is not well-formed. Please make sure all XML elements are closed properly.
XML error message: The reference to entity "key" must end with the ';' delimiter.

OR THIS

Your template could not be parsed as it is not well-formed. Please make
sure all XML elements are closed properly.
XML error message: The entity name must immediately follow the '&' in
the entity reference. 


For example this is incorrect: <title>Boys & Girls</title> while this is
correct: <title>Boys &a m p; Girls</title>. Omit the spaces between a m p. Do this in links also.


In XHTML, the script and style elements are declared as having #PCDATA content. As a result, < and & will be treated as the start of markup, and entities such as < and &a m p ; will be recognized as entity references by the XML processor to < and & respectively. Wrapping the content of the script or style element within a CDATA marked section avoids the expansion of these entities. The only delimiter that is recognized in a CDATA is the "]]>" string which ends the CDATA section


IF AN ATTRIBUTE IS MISSING. Every attribute must have a value. Every attribute value should be enclosed in double quotes. For example : <table rows="2">. If not you will get following error message :

One of the sections is missing the required id attribute. Every section should have a unique id.


IMPROPERLY NESTING ELEMENTS. (elements must be closed in reverse order). This is incorrect: <em><strong>Include some text.</em></strong>. While this is correct:<em><strong>Include is some text.</strong></em>.


SPECIFY ALTERNATE TEXT FOR IMAGES using the alt attribute. For example : <img src="URL OF IMAGE">ALT. TEXT FOR IMAGE</img>(XHTML 2.0)


CASE MATTERS! In XHTML case matters. If you have <HTML> then you must close it with </HTML>. If instead you close it with </html> you will get the following error :

Your template could not be parsed as it is not well-formed. Please make sure all XML elements are closed properly.
XML error message: The element type "HTML" must be terminated by the matching end-tag "".


VARIABLE DECLARATIONS
 : These variables are used in the Fonts and Colors subtab of the Template tab to enable the blogger to customize the fonts and colors of his template. These variable are defined in the "Variable definitions" part of the template. They are then used in the appropriate css code. For example a variable is defined as :

<variable name="bgColor" description="Page Background Color" type="color" default="#efefef" value="#ffff66">

In that part of the css which describes the body it is used as follows :

body {
background: $bgColor;
}

If you use a variable ($rightSbColor) in the CSS but do not define it in the VARIABLE DEFINITIONS section you will get the following error :

Invalid variable declaration in page skin: Variable is used but not defined. Input: rightSbColor

The solution is to delete the variable or define it in the Variable Definitions section.


SAME WIDGET ID ERROR : If you add a widget or Page Element with the same ID Number as a widget already present in the template you will get the following error :

More than one widget was found with id: LinkList1. Widget IDs should be unique.

To correct the error just change the number in the widget ID. In this case change it to LinkList2.


ADDING CODE BEFORE THE INCLUDABLE : If you add a line of code before the includable line in an expanded widget template you will get the following error :

The widget with id "Blog1" cannot contain element: "b:if". A widget can only contain b:includable elements

To prevent this always add any code after this line <b:includable id='main'> in the widget code.


WIDGETS SHOULD ALWAYS BE WITHIN A SECTION : If you add a widget before the section line in a template you will get the following error :

The widget with id HTML1 is not within a section (actual parent element is: b:if.) Every widget should be in a section.

To prevent this add the widget code after this line in the template :

<b:section class='sidebar' id='sidebar' preferred='yes'>


LINK ERROR : Following error is seen :

Your template could not be parsed as it is not well-formed. Please make
sure all XML elements are closed properly.
XML error message: The value of attribute "href" associated with an
element type "a" must not contain the '<' character.when you have in your template code of this type :

<a href="<data:post.url/>">Read more!</a>

To correct this error change the code to the following :

<a expr:href='data:post.url'>Read more!</a> 


Similarly this code :

<span class="<data:post.author/>">
<data:post.body/>
</span> 

will give this error :

Your template could not be parsed as it is not well-formed. Please
make sure that all XML elements are closed properly.
XML error message: The value of attribute "class" associated with an
element type "span" must not contain the '<' character.

So change it to :

<span class="data:post.author">
<data:post.body/>
</span>


ENCLOSE ATTRIBUTE VALUES IN QUOTES : Attribute values should always be enclosed in quotes otherwise you will get this error :

Your template could not be parsed as it is not well-formed. Please make sure all XML elements are closed properly.
XML error message: Open quote is expected for attribute "width" associated with an element type "img".
Instead of width=56 always use width='56' within code. It does nort matter ehether the quotes are double or single.


DO NOT INCLUDE TWO STYLE SHEETS 
If you include two b:skin tags in the template you wiil get this error


We were unable to save your template
Please correct the error below, and submit your template again.
There should be one and only one skin in the template, and we found: 2

Source: blogdoctor

Add Back to Top Button for Blogger

This is one of cool trick for blogger to create a smooth scroll to top. If you have lot of content on you blog pages, and if you want to make your blog to be easy to navigate for your readers, a back to top button will make it easy and perfect. We also use this cool gadget and if you want to check how it works, Go to bottom of our blog and click arrow button which is in right corner of the bottom.


For do this follow me:

1. Login to your blogger dashboard and Select Your Blog.
2. Click "Template" ,and click Edit HTML.
3. Now Click "Proceed"
4. Click on 'Expand Widget Templates' .
5. Find </body>  ( Press Ctrl+f )
6. Add this code after </body>

<a href='#' style='position: fixed; bottom:5px;left:5px;' title='Back to Top'>

<img src='http://a.dryicons.com/images/icon_sets/coquette_part_5_icons_set/png/64x64/blue_arrow_up.png' style='border: none;'/></a>

With change the red color button URL

7. Finally save your template.

List of  back to top button